Tombs of Amascut: Raid Rewards V2
02/23/2022
We haven’t forgotten about those Tombs of Amascut rewards! In fact, we’ve been discussing your feedback at length. However, in January, a new piece of content dropped that made us re-think a few of our decisions: Nex.
The rewards for defeating the fearsome Angel of Death were really impressive, and this inspired us to reassess Tombs of Amascut’s loot. Your input was also crucial in helping us see how we could push even further with these desert delights!
So, what’s changing? While we are still happy with some of the items we’ve designed, others have undergone significant reworks. As an added bonus, we’ve also included two new features that will neatly coincide with this particular Raid. Let’s get into it!
As always, we refer to the in-game timings as cycles. Each cycle is equal to 0.6 seconds and is also commonly referred to as a 'tick' by the wider community.
The Masori were powerful ranged weapon-wielders active during an ancient Kharidian war. They focused primarily on defending ordinary people from the violent thieves and murderers who sought to take advantage of the wartime chaos. This mighty clan has been long since disbanded, but their weapons can still be found in the palaces of wealthy Menaphites, and among the treasures of long-dead Pharaohs.
Requirements
- 80 Ranged
- 30 Defence (80 when upgraded)
Probably the biggest change in this rework is the removal of the Low Life effect – and the additional Dodge mechanics – from Masori Armour. Although some of you liked the unique effect for this set, its uses were a bit niche and many of you felt the tradeoff was simply not worth it.
As such, the armour set will now consist of the Helmet, Chestplate and Chainskirt – and no Amulet. This doesn’t mean that Low Life won’t be visited in some form in the future, but for now, it won’t be a feature here.
Instead, the stats that came from the effects of Low Life on the original Masori Armour will make up the base versions of the new set – plus the original Prayer Bonus:


Wait… base version? Yep, we’ve decided to take a similar approach to Nex rewards and offer some shiny upgrades to the Masori Armour, with the base version still being equippable, with different requirements.
Using plates broken down from Armadyl’s Armour and crafting them (with 90 Crafting) onto your Masori Armour pieces with a chisel, you can create the upgraded versions.
Breaking Down Values
- Armadyl Helmet - 1 Armadyl Plate
- Armadyl Chestplate - 4 Armadyl Plates
- Armadyl Chainskirt - 3 Armadyl Plates
Crafting Values (with 90 Crafting)
- Armadyl Helmet - 1 Armadyl Plate
- Armadyl Chestplate - 4 Armadyl Plates
- Armadyl Chainskirt - 3 Armadyl Plates
The base equipment will focus on low Defence and high Offence, making it one of the best choices for an Offence Ranged build, while the upgraded version will be the new best-in-slot Ranged gear in all categories:


The fully upgraded armour will surpass the Offence capabilities of Armadyl’s pieces. For comparison, the fully upgraded armour will have the following stats over a full Armadyl’s set:
- Stab Accuracy: +18
- Slash Accuracy: +18
- Crush Accuracy: +18
- Mage Accuracy: +23
- Ranged Accuracy: +19
- Stab Defence: +8
- Slash Defence: +10
- Crush Defence: +10
- Mage Defence: +12
- Ranged Defence: +8
- Ranged Strength: +8
- Prayer Bonus: 0
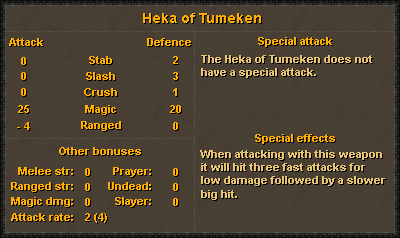
Heka of Tumeken
Tumeken was the God of Sun and Elidinis was the Goddess of Fertility. As husband and wife, they were the joint leaders of the Menaphite Pantheon. But while Tumeken and Elidinis steered the people of the Kharidian Desert spiritually, it was the responsibility of the human Pharoah to rule in practical matters. Osmumten was the last Pharoah before the end of the ancient war, and he fought alongside Tumeken against enemy forces, until the noble God sacrificed himself to end the conflict. After her husband’s death, Elidinis fled to mourn the loss of her family. Before before she left, the Goddess gifted Osmumten with Tumeken's Heka and her own broken Ward.
Requirements
- 85 Magic
The Heka of Tumeken is a wand-like magical weapon, requiring 85 Magic. It has a built-in spell with charges which will need to be replenished, using one Soul Rune and three Chaos Runes per charge.
The wand stats haven’t changed too much and still have a base attack rate of two cycles with every fourth hit, firing a bigger attack that deals significantly more damage, and with a longer delay afterwards. For a more visual example:
20 damage → 20 damage → 20 damage → 60 damage
2 cycles → 2 cycles → 2 cycles → 4 cycles
And here’s the newest example of how damage will be calculated:
- Standard fast attacks scale based on '(Magic Level / 6) + 1' for the base max hit.
- The slower fourth attack scales based on '(Magic Level - 25) / 2' for the base max hit.
- Mage Strength no longer applies uniquely to the Heka.
While the original design of the Heka of Tumeken was great on paper, it was lacking a certain 'something'.
If you look at previous raid rewards like the Twisted Bow and the Scythe of Vitur - they were unique, powerful, and most importantly had that wow factor that made them worth the grind.
Instead of scaling differently according to your Magic Strength, the Heka will now unleash a special effect dependent on the spellbook you are attuned to, alongside a fourth, more powerful attack, allowing you more options for your builds. Here’s what we’re thinking:
- Standard Spellbook: 10% boosted damage.
- Ancient Spellbook: The spell will hit into a 3x3 Area of Effect (AoE) attack.
- Lunar Spellbook:
- Heal allies by 5% of your current Magic level (rounded down) along the path of the projectile (capped at 5 players).
- Increase the Heka’s attack range by 1 (This applies to all attacks not just the 4th).
- Arceuus Spellbook: Lose 3 Prayer points and in return:
- The boost is not permanent and will be lost after a period of time.
- Drain 5% of the NPCs Magic Level (up to 20%).
- Boost your Magic level by 50% of drained Magic level (capped at 15% additional Magic level).
This means you’ve got a fast-attacking weapon that can be mastered to work effectively in tricky encounters, along with free additional mastery to explore with the unique spellbook effects and varying attack speeds. Because, let’s be real… Magic needs some love!
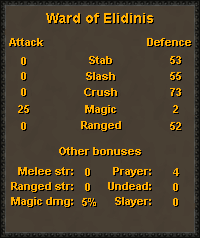
Ward of Elidinis
We haven’t done too much tweaking to the Ward of Elidinis, since it effectively meets our original design goals. Here’s a recap:
Requirements
- 80 Magic
- 80 Defence
- 80 Prayer
The Ward of Elidinis will be the new best-in-slot magical shield. Players will get the broken Ward as rare loot from the Tombs of Amascut. With 90 Prayer and 90 Smithing, you'll be able to combine the broken Ward with an Arcane Sigil and 10,000 Soul Runes to repair it.
Players without those stats will be able to pay Abbot Langley 20,000,000 GP to create it for them. Additionally, existing Arcane Spirit Shields can be handed to Langley for disassembly, returning just the Arcane Sigil back, so players can make the switch. This won’t require a GP fee, but will destroy a Blessed Shield in the process.

Both the broken and fully repaired Wards can be equipped, but the broken Ward will be tradeable, and untradeable when fixed. Players can dismantle it to recover both the Sigil and the Ward, but the Runes will be lost. Dying in PvP will result in the Sigil and the broken Ward being dropped.
Here are the stats for the charged Ward of Elidinis, and the Arcane Spirit Shield's stats, for comparison:

Ahmek was a formidable warrior who sought to capitalise on the political instability at the end of the war. He crafted a powerful ring which he imbued with the unstable energy left behind from Tumeken's sacrifice. Ahmek sought to use this ring to emerge as a new power in the region; by forcibly uniting thieves and mercenaries under his command, he would overthrow Osmumten. His scheming proved fruitless, however, when the ring was stolen, and he was murdered in his sleep. The Menaphite Guards claimed the ring from the body of the murderous thief and dutifully presented it to the Pharoah.
We’ve not made any changes to the Lightbearer’s stats or effects, so here’s a reminder:
The Lightbearer is a ring with no Attack, Defence, or other bonuses. It does, however, have a unique effect. When equipped, your special attack energy will regenerate 100% faster (approximately 15 seconds per 10% / 150 seconds per 100%). Unequipping the ring will cause the timer to reset.
We assume that for the most part you'll want to continue using rings like the Berserker ring. But there will be some situations where the additional special attack rate will warrant its use. We think this ring will shine in places where kill times are longer, or where you'll want to use a special attack per kill (like Graardor, K'ril, Abyssal Sire etc). You could even use it whilst Woodcutting or Fishing!
Known to his people as Osmumten the Hunter, he was renowned for bringing down many of the land's deadliest beasts. During his hunts, he wore armour and weapons crafted by the region's finest artisans. One such weapon was his Fang, with which he was eventually buried.
Requirements
- 82 Attack
Osmumten’s Fang is a five-cycle weapon that packs serious punch while on Stab. It’s decently effective against low defence NPCs, but it excels against monsters with a high defence. We expect its damage-per-second output to be comparable to Rapier-tier weapons on opponents with low Defence, with much greater damage-per-second output on opponents with higher Defence.
We’re doing something a bit different with the Fang, so let’s look at how the damage will be calculated. Instead of rolling ‘0-max’ hit like most weapons, it will instead:
- Roll ‘(max hit * 0.15) - (max hit - (max hit * 0.15))’
- For example: If the max hit is 60, then it would roll between 9-51.
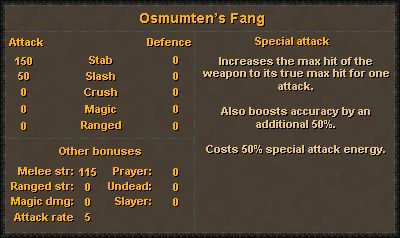
Alongside this, Osmumten’s Fang will include a special attack. Costing 50%, this special attack would increase the max hit of the weapon to its true max hit for one attack, and boost accuracy by an additional 50%.
For example: If its max hit was 60, it would then roll 9-60, provided it passes accuracy.
One new aspect of the Fang is more similar to the Crystal Halberd and various Spears: this weapon will deal full damage to the Corporeal Beast when on Stab. In addition, we will be removing the 50 damage cap that Corp currently has. Now you’ve got a weapon that’s great for taking on ol' Corp, so you can have more fun hunting the Sigil to make that completed Ward of Elidinis!
Stat Renewal Potion
How about something completely new! We know that one of the most useful potions you can create during Chambers of Xeric is Overload, which boosts all the player's combat stats by 6 + 16% while damaging them for 50 HP. Uniquely, the boost is repeated every 15 seconds until the effects wear off, after which the player heals 50 HP. This makes it better than your standard potions as it ticks up over time.
Tombs of Amascut will introduce a new secondary component called Lily of the Sands. When combined with a Dwarf Weed, this will create the new Stat Renewal Potion. You will need 71 Herblore to create it, and each one you make will net you 150 XP.
Essentially, the Stat Renewal Potion has the same stat-renewal aspect of an Overload, so if your combat stats are below base, it will restore them back up. This means:
- The effect would last for five minutes.
- The amount it would restore is 16% of your skill level + 6
This potion will not boost your stats above your base level.
Pharaoh's Sceptre Teleport
Ok, one more treat while you’re here! As we’re raiding in the desert, we want to give players an easy way to get to an instance once it comes available.
As it happens, there's already a specific item that can get you to a couple of important places within the Desert: The Pharaoh’s Sceptre. So, let’s make use of it!
Use the Sceptre on an obelisk outside the raid entrance and you'll be granted an additional teleport close to the raid entrance. This will only be possible after completing Beneath Cursed Sands.
If this passes, we’ll also tidy up the right-click menu, so you just have ‘Teleport’ and ‘Teleport to Previous’ options on your Sceptre. Clicking on ‘Teleport’ will then bring you an interface with more options of where to go.
The Sceptre would also be recoloured and made untradeable after completing its attunement.